Window Tint on a Mazda 5
This is not the definitive "how to tint car windows" page. It is about using one particular product on one particular car to suit one particular person's taste. Please keep googling if you are looking for more general instruction.
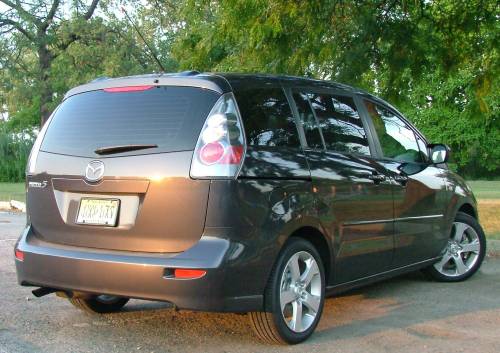
The 2006 Mazda 5 is a very successful combination of design, features, and price: a sporty minivan the size of a compact car, available with alloy wheels and 5-speed stick-shift for $18000 list price. One feature it does not have is tinted window glass. Since it first became available during the peak heat of a hot summer, and has a minivan's worth of glass, shoppers and buyers have noticed the greenhouse effect.
This article covers one solution: Tint your Mazda 5 windows yourself. The first order of business is to make sure that you are tinting your own windows for the right reasons. Since this is a task that you can have done professionally for $200 or so, "to save money" is not a good reason. If you do it yourself you will very likely be paying yourself less per hour than you could make watering your neighbor's lawn. "To avoid the hassle of finding the right place to have it done, and of leaving the car there for a day" is a better answer. That one applies to me. Maybe it works for you, too.
My real answer is "because I want my new car to be MY new car. I didn't jet the carburetors or reset the torsion bars-- it doesn't have those things -- but I did make it look different from a lot of other Mazda 5's and I did it by my own hand." If you do choose to do it yourself, when the car is new is a good time to do it, because the window glass hasn't crudded up yet. The directions for tinting often tell you to wash the inside of the glass twice, and in between the two washings scrape the windows with a new razor blade held at an acute angle to the glass. Even tho' you just washed the windows, you will in fact get some crud showing up on the edge of the blade when you do this on a car with tens of thousands of miles on it.
The second order of business is to try to scare you out of doing this. This is my fourth time tinting car windows. (This Porsche-powered Vanagon is one of them.) I do just barely a good enough job each time to do one more. It is hard work; you have to concentrate, plan ahead, and not get lazy for a second for a whole period of hours. At times you have to do things right in a hurry, when you only get one chance. Unless you are a really dedicated do-it-yourself-er, have the pros do it.
Now, here's the part where the choice of one particular product gets important. You have basically three do-it-yourself choices in window tint. One is a precut set, with the tint material already cut to shape for each window or window-section. This is relatively expensive. The set from Do It Yourself Window Tint http://www.doityourselftint.com/ , for instance, is $90, including tools and a how-to video. You need to watch the video carefully, or work with a friend who has tinted before, because you only get one of each of the precut panels.
Another choice is a big roll of tint material that you cut for yourself. This is much more difficult, but cheaper, maybe $25-30, and you will probably have enough extra material so you can redo a panel that you cut too small or that gets stuck to the dog.
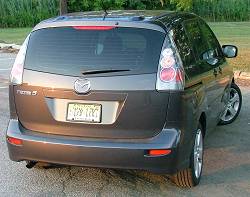
I decided to do my windows using a particular product from Gila -- static cling tint. Gila (on line or at Autozone) offers standard window tint, but it also offers an option that is significantly different from most window tint: static cling tint, that does not use adhesive. This means you get more than one try to get it right, and it also means that you can peel it off if you hate it. You can apply a panel on the outside of a window, cut it to size there, and then apply it on the inside. The tint is heavier, softer, and more flexible than conventional tint. It is sufficiently flexible so that the glass of the back hatch, which is a very compound curve, can be done with one piece of plastic. It is not as scratch-proof (against kids' fingernails or a handlebar of a bicycle loaded inside the van) and it doesn't come in the variety of colors, transparency, UV-blocking, metallized, etc., that the conventional tint does these days. The results are not as clear and sharp as conventional tint, but you can get a good idea of whether it's going to satisfy you in 30 minutes by doing the little porthole windows.
 The semi-permanent
approach appealed to me a lot. I wasn't sure that I wanted the dark tint.
Most tints come in versions that permit 35%, 20%, or 5% of ambient light
to get through. The static cling material is 20% and worried that it might
be too dark. It turns out it's fine for my taste.
The semi-permanent
approach appealed to me a lot. I wasn't sure that I wanted the dark tint.
Most tints come in versions that permit 35%, 20%, or 5% of ambient light
to get through. The static cling material is 20% and worried that it might
be too dark. It turns out it's fine for my taste.
And I worried that I wouldn't do a good enough job, and would want to peel it off and pretend I had never tried it. I'm not blissfully happy with my results, but as you can see in the photos it's a "monet" -- it looks terrific from a distance.
I bought the smaller cheaper set of tools, also from Gila. They don't look like much when you spill them out of the box, but the exacto knife is easier to work with than the single-edge razor blades I used to use, the spray bottle does a good mist rather than a squirt, and the little sqeegee gets into corners well. You also need a good lint-free cloth for cleaning the windows inside and out before you start. An old 100% cotton dress shirt is more lint-free than an old tee shirt. They suggest buying and using the special Gila solution in your spray bottle, or baby shampoo. I just used tap water and it went ok.
Other notes on the static cling product: When you peel the backing off, some of the white surface of the backing may stick to the tint, especially if the material kinks at all as you peel. The white stuff is water-soluble, so use your lint-free cloth and lots of water or ammonia-free window cleaner to get it off. You definitely don't want that white stuff between the tint and the window.
Unless you dismount the rear hatch and lie it on the living-room carpet, gravity is against you as you work on that big window. Use some masking tape around the periphery of the tint panel to stick to the plastic surround of the glass to hold the weight while you smooth it onto the glass.
One box of static cling material (24 x 78 inches) is enough for the back glass, the two little square portholes, and the small fixed glass panels of the sliding doors. You'll have to get another box if you want to do the big windows of the sliding doors. Most states won't let you do the front door windows, much less the windshield. If you want to do a six-inch panel across the top of the windshield, you'll have enough in the second box.
I thought carefully about doing just the portholes and back hatch. If you park facing north, that will at least keep the sun from streaming in the back, and those three windows are the easiest to get looking good because the edges of the glass are hidden both inside and out, so you don't have to cut so neatly. But I'm glad I did the sliding doors as well. The car looks great and I think it makes a perceptible difference in the temperature of the car after it sits in the sun.
Please take pictures and make them available in one of the Mazda 5 discussion groups, if you do something different from what I did. I will be interested to see different shades of tint and some of the partially mirror-faced tints, when other Mazda 5 owners take those steps.